Cluster Pi Setup
The Illuminator can be deployed to a cluster of Raspberry Pi’s. It requires one Raspberry Pi acting as a server or ‘master’ and several clients Raspberry Pi’s. Raspberry Pi’s must be connected and configured as a local network, and the server must be configured to have permissions to access and control the clients through the Secure Shell Protocol (SSH).
During simulation, the server engage with the clients to run the simulations defined in the simulation configuration file, and
information is exchanged between Rasberry Pi’s using network sockets.
The server provides a Dashboard to visualize the results, and saves them to a .csv files for later analysis.
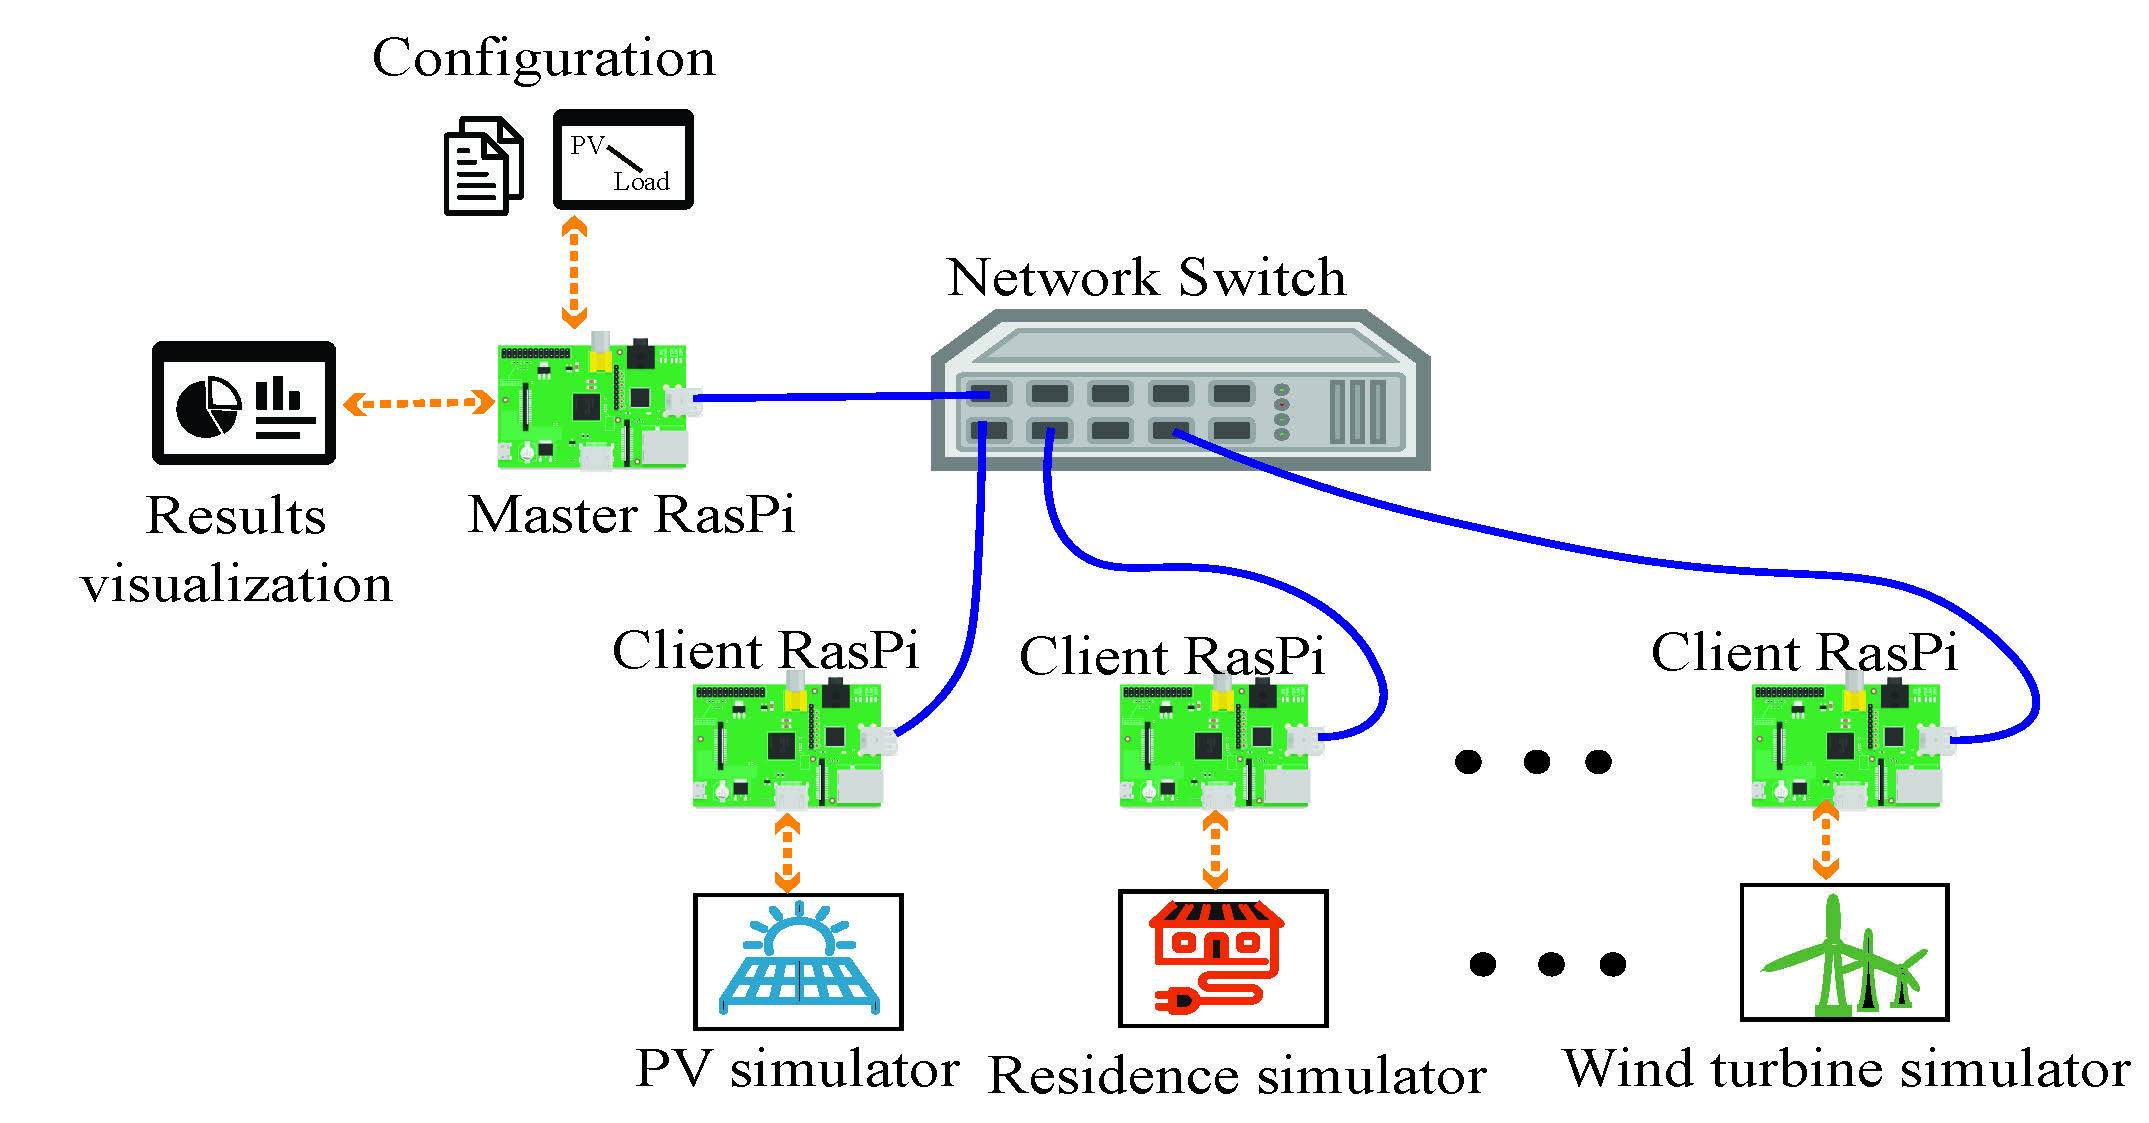
Hardware Requirements
A Raspberry Pi to use as a server.
One or more Raspebrry Pi’s to use as clients.
A networkw switch to connect all Rasberry Pi’s as a local network.
Set up
Conduct the following steps on each Raspberry Pi to deploy the illuminator in a cluster. These instructions require to install Illuminator from source.
Warning
The steps were defined before the release of version 3.0.0 and therefore issues might arise when using the latest Illumiator version.
Set an static IP address for the Raspberry Pi. Use the following command on the terminal to open the
dhcpcd.conffile:sudo nano /etc/dhcpcd.conf
In the
dhcpcd.conffile, find the information to change the IP address to static as following:interface etho static ip_address=192.168.0.1/24 # change the IP address as you want
Give all users execute permission to all the documents in
runshfile/in order to make sure the server can access the client model.chmod -R a+X *dir*
Finally, reboot the Raspberry Pi using
sudo rebooton the terminal.Configure SSH connections so that the server can connect to the clients without a password.
Install the Illuminator Python package from source, and the addional dependencies:
# or, if from source code
pip install Illuminator/
# aditional dependencies
pip install tk python-csv python-math scipy wandb itertools
Use the following command on the server’s terminal to check the connections for each of the clients:
# notice that the followng assumes that each client has a
# user named 'illuminator'
ssh illuminator@<ip> #<ip> represent the client's IP address set in step 2
Run the
build_runshfile.pyfile in the configuration directory on the server, this will generate arun.shscript. Pass the appropiateconfig.yamlfile containing the configuration for the simulation scenario:python3 build_runshfile.py <config.yaml>
The runs.sh file contains a list of commands that will start the models required by a simulation defined in the config.yaml, such as:
# Example
lxterminal -e ssh illuminator@192.168.0.1 './Desktop/illuminatorclient/configuration/runshfile/runBattery.sh 192.168.0.1 5123 /home/illuminator/Desktop/Final_illuminator'&
lxterminal -e ssh illuminator@192.168.0.2 './Desktop/illuminatorclient/configuration/runshfile/runBattery.sh 192.168.0.2 5123 /home/illuminator/Desktop/Final_illuminator'&
Important
Explanation
lxterminal starts a terminal on a remote machine (a client). So lxterminal -e ssh illuminator@192.168.0.1 would use SSH to login to machine 192.168.0.1 with the user illuminator which has no password (this should be improved).
Three values are passed to the ssh command (the part between single quoates): './Desktop/illuminatorclient/configuration/runshfile/runWind.sh 192.168.0.1 5123 /home/illuminator/Desktop/Final_illuminator'&.
This starts the script ./Desktop/illuminatorclient/configuration/runshfile/runWind.sh on the remote machine with the following parameters:
IP address:
192.168.0.1Port:
5123Path of mosaik file:
/home/illuminator/Desktop/Final_illuminator
The & at the end starts the process in the background, so that the run.sh script does not wait for the command to finish but executes the next command immediately.
For example, the runWind.sh looks like this:
#! /bin/bash
cd $3/Wind
python wind_mosaik.py $1:$2 –remote
There you see the three parameters in action.